Why the seam is 45 degrees

The miter seam always runs from the quilt's corner (the inner end of the border seams) to the point where the outer edges of the two borders cross. When both borders are the same width, that line splits the corner exactly in half: 45 degrees. Its length is the finished border width times 1.414 (the square root of 2), so a 4½-inch band has a miter seam about 6⅜ inches long.
When the borders are different widths, say 4-inch sides and 6-inch top and bottom to make a quilt longer, the seam still runs inner corner to outer corner, but it isn't 45 degrees any more. It makes an angle of about 56 degrees with the top border's seam and 34 degrees with the side border's seam (56 degrees is the angle whose tangent is 6 ÷ 4). Don't use the ruler's 45-degree line for that; draw a straight line between the two corners.
How long to cut mitered strips
Each strip runs past both corners by the border width, plus a few inches to spare:
strip length = quilt measurement through the center + 2 × finished border width + 4 inches
For several borders mitered as one band, use the width of the whole band, and cut every strip in that band to the same length. The inner strips will look far too long. They aren't: the extra is cut away when you trim the miter.
Worked example: three borders mitered as one
A top measures 40½ × 50½ inches through the center (40 × 50 finished). It gets three borders mitered together: a 1-inch red, a ½-inch cream and a 3-inch navy. The band is 4½ inches wide finished, so the quilt finishes at 49 × 59 inches. All numbers are checked by calculation, using 40 usable inches across the fabric.
| Border | Cut strip width | Side strips (2) | Top and bottom strips (2) | Strips across the fabric | Yardage |
|---|---|---|---|---|---|
| Red, 1 in finished | 1½ in | 63½ in | 53½ in | 6 | ¼ yd |
| Cream, ½ in finished | 1 in | 63½ in | 53½ in | 6 | ¼ yd |
| Navy, 3 in finished | 3½ in | 63½ in | 53½ in | 6 | ⅝ yd |
- Side strips: 50½ + (2 × 4½) + 4 = 63½ inches. Top and bottom: 40½ + 9 + 4 = 53½ inches.
- Each border needs 2 × 63½ + 2 × 53½ = 234 inches of strip. Six strips joined end to end give 240 inches, enough with 6 to spare, but only just: square the ends carefully.
- Sewn together, the three strips make a band 5 inches wide cut (1½ + 1 + 3½ = 6, less ½ inch for each of the two seams that join them), which is 4½ inches finished.
- For a stripe or a long border print, cut the strips along the length of the fabric instead, so there are no joins: you need a piece 63½ inches long plus a little for straightening, which is 1⅞ yards.
Sewing several borders as one band
- Sew the strips for each side together lengthwise, in the same order on all four sides (inner border on the same edge every time). Press the seams toward the outer border, or open to reduce bulk at the miter.
- Fold each band in half to find its center and mark it on the inner edge. From the center, measure out half the quilt's center measurement in each direction and mark: these marks meet the quilt's corners. For the example, the side marks are 25¼ inches each side of center.
- Pin and sew each band to the quilt, matching the center and end marks, starting and stopping exactly ¼ inch from the quilt's corners with a backstitch.
- Fold the quilt diagonally at the corner, right sides together, so the two bands lie on top of each other. Line up the seams between the borders with pins pushed straight through both bands. This is the step that makes the corners match.
- Draw the miter line from the end of the stitching to the outer corner, sew from the inside out, check from the front, then trim to ¼ inch and press open.
The pressed miter: no drawing
You can also make the miter on the ironing board and see the result before you sew it.
- Sew the borders on as above, stopping ¼ inch from each corner.
- Lay the corner right side up on the ironing board. Let the side border lie flat and straight. Lay the top border over it, then fold the top border's end under at 45 degrees so its fold runs from the quilt's corner to the outer corner.
- Check the fold with the 45-degree line of a square ruler and make sure the corner is square. Press the fold hard.
- Hold the fold with a thin line of washable glue or two pins, fold the quilt back so the pressed crease is exposed, and sew in the crease from the inner corner outward. Trim and press.
With stripes the pressed method is easier, because you can slide the top strip a fraction to line up the stripes before pressing.
Stripes and border prints
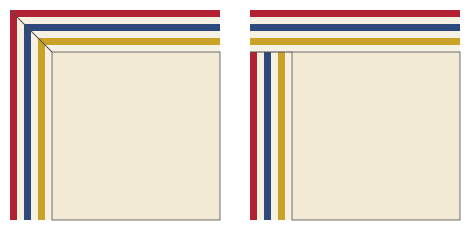
- Cut all four strips with the same stripe on the inner edge. If the stripe isn't symmetric across its width, every strip must also run the same direction relative to the quilt, inner edge to the quilt.
- Stripes that run across the border (perpendicular to the quilt's edge) only meet cleanly at the miter if each side is a whole number of repeats long. Measure the repeat, then adjust the border length by changing the width of a narrow inner border or a spacer, rather than easing the stripe.
- For a printed border design, find the center of a motif and line it up with the center of each side. Mark where the corners fall before cutting: a miter through the middle of a large flower looks deliberate, one through its edge looks like an accident. If the corners won't fall well, cut corner motifs as separate pieces and applique them on; our applique methods guide covers that.
- Directional prints (trees, houses, lettering) can't be right side up on all four sides. Run them upright on the sides and let the top and bottom be sideways, or choose a non-directional border.
When a miter won't lie flat
| Problem | Cause | Fix |
|---|---|---|
| Pucker at the inner corner | A border seam ran past the ¼-inch stopping point | Unpick the border seam back to the dot, then resew the miter starting exactly at the end of the stitching |
| Hole at the inner corner | Border seams stopped short, or the miter started away from them | Resew the miter from the exact end of the border stitching |
| Corner sticks up or dips | Miter not at 45 degrees (or not corner to corner) | Redraw the line from the inner corner to the outer corner |
| Border seams don't meet at the miter | Bands sewn in a different order, or stretched | Pin the seams together through both layers before sewing the miter; sew the bands in the same order on all sides |
| Corner isn't square | Bands cut or eased to different lengths | Check each corner with a square ruler before trimming; square up the quilt before binding |
A mitered border with a plain outer band shows off quilting well; a cable or a feather along it is traditional (see echo and feather quilting). The border calculator works out strip lengths and yardage for other sizes, and the binding goes on last: how to bind a quilt.
You might also like
 How to add borders to a quiltMeasuring through the center, butted and mitered corners, and border strip math with a worked example.
 How to bind a quiltDouble-fold binding from cutting strips to mitered corners and an invisible join.
 How to label a quiltWhat to write on a quilt label, four ways to make one and how to sew it on.
 Quilt as you go: joining quilted blocks with stripsQuilting each block on its own, then joining them with narrow front and back strips, with exact cut sizes.