
How the join works

Each join has two seams. The first sews the front strip, the first block and the back strip together in one pass. The second sews the other edge of the front strip to the second block. The back strip is then folded over the back of the second seam and stitched down by hand or machine. With a 1-inch front strip, the batting edges of the two blocks butt together exactly, so there's no gap or ridge in the batting.
The rule that makes it work: the back strip is cut twice as wide as the front strip. That always leaves the folded edge ¼ inch past the second seam. Other widths:
| Front strip, cut | Shows on the front | Back strip, cut (folded in half) | Gap between batting edges |
|---|---|---|---|
| 1 in | ½ in | 2 in | None, they butt |
| 1½ in | 1 in | 3 in | ½ in |
| 2 in | 1½ in | 4 in | 1 in |
Wider strips leave a gap in the batting under the sashing; fill it with a strip of batting cut to the gap width, or the sashing will feel flat and thin.
Worked example: a 3 × 4 nine-patch quilt
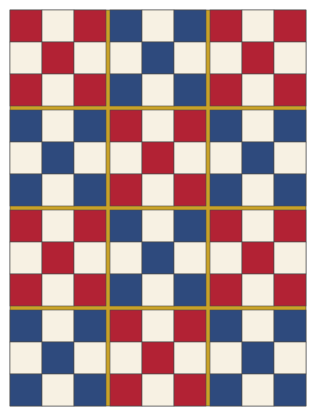
Twelve nine-patch blocks, 12 inches finished, set 3 across and 4 down. Six blocks have red corners and centers, six blue, all with cream. The finished quilt is 37 × 49½ inches. Yardage assumes 40 usable inches across the fabric; all numbers are checked by calculation.
| Fabric | Cut | Yardage |
|---|---|---|
| Red | 4 strips 4½ in, crosscut into 30 squares 4½ × 4½ | ⅝ yd |
| Blue | 4 strips 4½ in, crosscut into 30 squares | ⅝ yd |
| Cream | 6 strips 4½ in, crosscut into 48 squares | ⅞ yd |
| Block backing | 6 strips 14½ in, crosscut into 12 squares 14½ × 14½ | 2½ yd |
| Batting | 12 squares 14½ × 14½ | A twin batting (72 × 90) gives 24 |
| Joining strips (gold) | 6 strips 1 in and 6 strips 2 in (see below) | ⅝ yd |
| Binding (gold) | 5 strips 2½ in | ⅜ yd |
The squares of backing and batting are 1 inch bigger than the block on every side, to allow for draw-up during quilting and for trimming.
Joining strips, cut from the 1-inch and 2-inch strips:
- 8 front strips 1 × 12½ inches and 8 back strips 2 × 12½ inches, to join the blocks in each row (2 joins per row, 4 rows). Three fit in each strip.
- 3 front strips 1 × 37½ inches and 3 back strips 2 × 37½ inches, to join the 4 rows. One fits in each strip.
Fold every 2-inch back strip in half lengthwise, wrong sides together, and press.
Step by step
1. Make and quilt the blocks
- Piece the nine-patches: three rows of three 4½-inch squares, with a scant ¼-inch seam. Each block should measure 12½ inches.
- Center each block on a batting square laid over a backing square (right side down). Pin or spray baste it.
- Quilt each block. Keep the design at least ½ inch from the block's edge if it has to start and stop, and stop knots out of the seam allowance. Quilting that runs straight off the edge is fine. Use the same density on every block so they stay the same size.
2. Trim the blocks
Trim every block to exactly 12½ inches square, cutting through all three layers at once. Use a square ruler and line up its diagonal with the block's diagonal; see squaring up blocks. Quilting shrinks blocks a little, so trim them all to the size of the smallest one if any come up short, and adjust the strip lengths to match. All twelve must be identical.
3. Join blocks into rows
- Lay block A right side up. Lay a 1-inch front strip on it, right side down, raw edges along the right edge of the block.
- Turn the block over and lay a folded back strip on the backing, raw edges along the same edge, fold pointing into the block. Pin or clip all the layers.
- Sew through everything with a ¼-inch seam. A walking foot keeps the layers together.
- Press both strips away from the block: the front strip on the front, the back strip on the back.
- Lay block B right side down on the front strip, its edge along the front strip's raw edge. Sew with a ¼-inch seam through the front strip and block B only, keeping the back strip folded out of the way.
- Open block B and press. The front strip now shows ½ inch.
- Bring the back strip's fold over the second seam on the back, where it lies ¼ inch past it, and stitch it down: by hand with a blind stitch, or by machine from the front, stitching in the ditch on block B right beside the front strip, catching the back strip underneath.
Add block C the same way. A finished row measures 37½ inches.
4. Join the rows
Join the rows in exactly the same way with the 37½-inch strips. Pin at each vertical strip first so the strips line up from row to row; it's the same idea as nesting seams in an ordinary quilt top.
5. Bind
The quilt is finished apart from the edge. Join the 2½-inch strips and bind it as usual. The perimeter is 173 inches, and with 10 inches for corners and the join, 5 strips is enough.
Where QAYG helps
It suits big quilts on a small machine, quilters who can't kneel to baste a whole quilt, and group projects. A charity group or a family can each quilt their own blocks, then one person joins them, much as volunteers on the 9-11 memorial quilts each stitched their own squares for others to assemble. It also lets you change the quilting design block by block, which is a good way to practice free-motion motifs on a real project.
The trade-offs: the strips show on both sides, so they're part of the design, and the joins are slightly stiffer than the rest of the quilt.
Common mistakes and fixes
| Problem | Cause | Fix |
|---|---|---|
| Rows don't line up | Blocks trimmed to different sizes | Trim all blocks to the same size, smallest if needed |
| Back strip doesn't cover the second seam | Back strip cut less than twice the front strip width | Cut the back strip twice the front width; recheck the seam width |
| Ridge or gap under the sashing | Front strip wider than 1 inch with no batting filler | Add a batting strip the width of the gap |
| Blocks shrink unevenly | Dense quilting on some blocks, light on others | Quilt all blocks at similar density |
| Bulky intersections | Front strips and back strips stacking at the crossings | Press seams firmly and grade the back strip's seam allowance at crossings |
Basting small sandwiches is quick, but the same rules apply; see how to baste a quilt. For straight-line quilting on each block, see straight-line machine quilting. For the ordinary method, where the whole top is quilted at once, see how to make a quilt.
You might also like
 How to square up a quiltTrimming blocks to exact size, squaring the quilted quilt before binding, and fixing wavy borders.
 Applique methods comparedFusible raw-edge, needle-turn, freezer paper, back-basting and machine applique stitches, with a table of when to use each.
 Mug rug from scrapsA 6 x 10 in quilted mat with a square for the mug and four scrap strips, in three sizes.
 Quilted pillow cover with an envelope backOne orphan block, a border and a no-zipper envelope back for an 18-in pillow form, with other form sizes.