
Pick a block with a plain place to write
Any block with a light, unpieced patch works. Two good choices:
- A strip block: a light center strip between two colored strips. It's quick to sew, gives a big signing area, and the strips turn every other way to make a woven look. The layout below uses it.
- A friendship star: a classic for exactly this kind of quilt, with a plain center square for the signature.
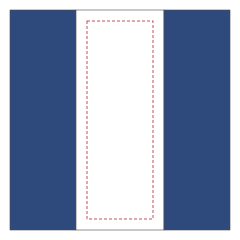
Keep signatures at least ½ inch inside the seam lines. Anything closer disappears into the seam allowance or gets crowded by the quilting. On a block cut 4½ × 10½ inches, that's ¾ inch from every cut edge.
Pens: what to use and how to test
Use a fine-tipped permanent pen with pigment ink. Many quilters use the Sakura Pigma Micron 05, a 0.45 mm fineliner. Its Amazon listing describes the ink as archival, waterproof, fade-resistant and bleed-free, and lists fabric as a recommended surface.
Know one catch before you buy a box of them. Sakura's own Pigma Micron page lists fabric as "decorative use only" and says the pens are not recommended for fabrics that will be washed. Sakura's FAQ adds that whether a mark stays permanent depends on the surface and on later washing and heat. So a wall quilt or a keepsake that will rarely be washed is a safer place for Micron signatures than a bed quilt that goes through the laundry every month. For a quilt that will be used and washed, hand signers a laundry marker such as the Sharpie Rub-a-Dub, which is sold for fabric and, according to its listing, stays permanent through washing and dry cleaning.
Whatever pen you pick, test it the way the quilt will be treated:
- Write on a scrap of the exact fabric you'll use for the signing patches.
- Let it dry, then press it with a dry iron set for cotton for about 30 seconds, moving the iron. Many quilters heat-set signatures this way. It's a common practice, not a step Sakura recommends.
- Wash the scrap the way you'll wash the quilt: with detergent, a color catcher and the dryer if that's what the quilt will see. Do it twice.
- Compare it to an unwashed scrap. If the ink faded or bled, try another pen.
Prewash the signing fabric before the test and before cutting. Sizing and finishes on new fabric can keep ink from soaking in.
For signatures that have to last through heavy use, embroider over them. A simple backstitch in two strands of floss along each signature turns the ink into a guide line, and thread doesn't fade the way ink can.
Prepare the blocks for signing
- Cut the signing patches before sewing the blocks. A loose patch is easier to sign flat on a table and easier to mail. Cut extras: people make mistakes, and some will want a second try.
- Iron a piece of freezer paper, shiny side down, to the back of each patch. It stiffens the fabric so the pen doesn't drag it. Precut 8½ × 11 inch freezer paper sheets are reusable, so each sheet can stabilize several patches.
- Mark the signing area lightly with a ruler and a water-soluble or heat-erasable marker, or draw it on the freezer paper so it shows through. Test the marker too; heat-erasable marks can reappear in the cold.
- Put a scrap of the same fabric next to the stack so signers can try the pen first.
Collecting signatures
At an event, set up a table with the prepared patches, two or three tested pens (no others nearby), a sample signed patch, and someone to hand them out. Ask people to write slowly; a quick scrawl on fabric skips. Let each patch dry flat before stacking.
By mail, send each person a prepared patch, a short note with the deadline, a pen if you can, and a stamped return envelope. Ask them not to fold the patch. Keep a list of who has one and who has sent it back. The memorial quilt guide covers running a group quilt by mail the way the 9-11 Memorial Quilt Project did: written rules, a name and town with every block, and a firm deadline with room to extend it.
For a memorial quilt, decide ahead of time what goes on a patch: a name only, a name and dates, or a short message. A sample patch is the clearest instruction.
After signing
- Peel off the freezer paper.
- Heat-set each patch from the back with a dry iron if you chose to do that in your test.
- Square up any patch that got stretched, trimming evenly so the signature stays centered.
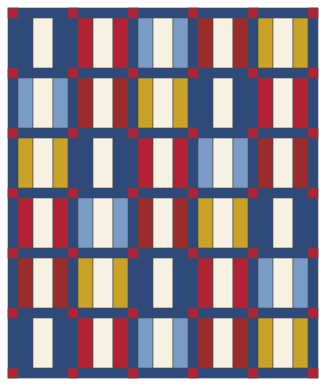
A 30-block signature quilt (62 × 74 inches)
Thirty strip blocks, 10 inches finished, set 5 across and 6 down with 2-inch sashing and cornerstones. Every cut and yardage below was worked out with 40 usable inches across the fabric.
| Fabric | Amount | Cut |
|---|---|---|
| Light (signing patches) | 1½ yd | 4 strips 10½ in, then 30 rectangles 4½ × 10½ (8 per strip), plus spares from the remainder |
| Block strips, one color or scrappy | 1⅞ yd | 6 strips 10½ in, then 60 rectangles 3½ × 10½ (11 per strip) |
| Sashing | 1⅝ yd | 5 strips 10½ in, then 71 strips 2½ × 10½ (15 per strip) |
| Cornerstones | ¼ yd | 3 strips 2½ in, then 42 squares 2½ in |
| Binding | ⅝ yd | 8 strips 2½ in (282 in needed) |
| Backing | 4⅝ yd | 2 lengths of 82 in, seamed side by side (70 × 82 in) |
| Batting | Twin, 72 × 90 | Trim to 70 × 82 |
- Sign and set the light patches first.
- Sew a colored strip to each long side of a signed patch with a ¼-inch seam. Press toward the colored strips. Each block measures 10½ inches square.
- Lay out the blocks 5 across and 6 down. Turn every other block a quarter turn if you like the woven look; signatures will then read in two directions, so decide before people sign if that bothers you.
- Block rows: sashing strip, block, sashing strip, and so on, starting and ending with sashing. Six sashing strips and five blocks per row; six rows.
- Sashing rows: cornerstone, sashing strip, cornerstone, and so on. Six cornerstones and five strips per row; seven rows.
- Join the rows, alternating sashing rows and block rows, and matching cornerstone seams. Every row measures 62½ inches.
- Quilt around the signing patches, not through them. Stitch in the ditch along the sashing, or quilt a design in the colored strips only.
- Bind and label it, with the occasion, the date and who made it.
| Blocks | Finished size | Sashing strips | Cornerstones |
|---|---|---|---|
| 3 × 4 = 12 | 38 × 50 in | 31 | 20 |
| 4 × 5 = 20 | 50 × 62 in | 49 | 30 |
| 5 × 6 = 30 | 62 × 74 in | 71 | 42 |
| 6 × 7 = 42 | 74 × 86 in | 97 | 56 |
Common problems
| Problem | Fix |
|---|---|
| Ink feathers into the fabric | Fabric not prewashed, or pen held still too long. Prewash and test; write at an even pace. |
| Signature runs into a seam | Mark the signing area on every patch, and cut spares. |
| Someone signs in the wrong pen | Remake that patch from a spare and ask them again. Keep other pens off the table. |
| Ink fades after washing | Embroider over the remaining signatures, and wash the quilt only when it needs it. |
Products on this page
Photos and prices come from Amazon and can change.
 Sakura Pigma Micron 05 pen, pack of 2Check price on Amazon
- Sharpie Rub-A-Dub Permanent Laundry Marker, FineCheck price on Amazon
- Gypsy Quilter heavy weight freezer paper sheets, 8.5 x 11Check price on Amazon
You might also like
 English paper piecingWrap fabric around paper shapes, baste with thread or glue, then stitch the edges together by hand.
 Quilts of Valor: requirements and how to make oneThe Foundation's size, fabric and label rules in plain English, plus a pattern that fits them.
 How to make a memory quilt from clothes or T-shirtsTurning a loved one's shirts into a quilt, with layouts, sizes and how to handle stretchy fabrics.
 Fourth of July stars and stripes table runnerTwo navy friendship stars with nine red and white stripes between them, 16 x 46 in, an easy weekend runner.