
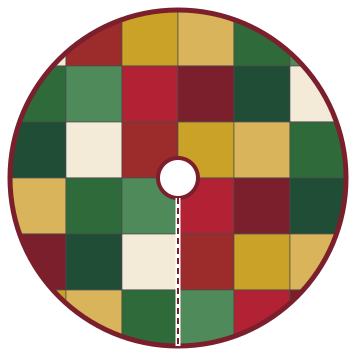
Fabric
| Fabric | Amount |
|---|---|
| Christmas prints | 9 fat quarters, or 9 prints at ¼ yd each |
| Binding and ties (cut on the bias) | ¾ yd |
| Backing | 2⅔ yd of standard width (two 46-in lengths, seamed), or a 46-in square of wide backing |
| Batting | At least 46 × 46 in (a throw-size package) |
| Also | String or a long tape measure, a pencil and a pushpin, for drawing the circle |
Cut and piece
- Cut 36 squares, 7½ × 7½ inches. A fat quarter gives 4; a ¼-yard cut gives 5 from one 7½-inch strip (cut the strip from the full 9 inches).
- Lay them out 6 by 6, spreading the prints so no two of the same touch. Sew 6 rows of 6, press the seams in alternate directions, and join the rows. The top measures 42½ inches square.
Quilt it before cutting
Layer the backing, batting and top, baste, and quilt. Straight lines in the seams both ways are fast and keep the squares crisp. Quilt all the way to the edges of the square, since you'll be cutting through the quilting.
Cut the circle
- Find the center: it's where the middle seams cross. Push a pin through a loop of string there.
- Tie a pencil to the string 21 inches from the pin and draw the outer circle, keeping the string taut. Then draw a small circle 2½ inches from the center (5 inches across) for the trunk opening.
- Draw a straight line from the outer circle to the center along one of the middle seams. That's the slit.
- Stay-stitch ⅛ inch inside all three lines (outer circle, inner circle, both sides of the slit line) to hold the layers together.
- Cut along the outer circle, the inner circle and the slit.
Bind with bias binding
Curves need binding cut on the bias (at 45 degrees to the grain), which stretches just enough to lie flat around a circle. Straight-grain binding puckers.
- Cut 2½-inch strips on the bias and join them with diagonal seams into one strip about 210 inches long. Fold in half lengthwise and press, as in our binding guide.
- Bind the outer circle first. Start and stop at the slit. Ease the binding around the curve without stretching it; trim the ends even with the slit.
- With the rest of the strip, bind the slit edges and the inner circle in one pass: down one side of the slit, around the center opening, and back out the other side. Fold the ends in neatly at the outer edge.
- Make six ties: cut six 1½ × 14 inch strips, fold the long edges to the center, then fold again and stitch. Ribbon works too. Sew three to each side of the slit, opposite each other, near the outer edge, the middle and the center.
Make it your own
- Bigger tree: a 7 × 7 layout of 7-inch squares makes a 49-inch square; cut a 48-inch circle (24-inch string).
- Use the leftover corners for mug rugs or ornaments.
- Embroider the year and your family name on one square before piecing.
More holiday projects: the Christmas star table runner and the quilted stocking. This pattern is free for personal use; please don't sell the pattern itself.
You might also like
 Quilted Christmas stockingA patchwork stocking with a lining, cuff and hanging loop, about 16 x 20 in, from a grid template.
 Quilted placemats (set of four)A set of four 12 x 18 in placemats with a column of squares, finished by turning instead of binding.
 Jacob's ladder quilt blockFive four-patches and four triangle squares that link into diagonal ladders, cut for 6, 9 and 12 inch blocks.
 Christmas quilt ideas, sorted by how much time you haveTwelve holiday projects, from one-evening gifts to a full Christmas throw.